100% Whole Grain Mexican Pancake Pizza
I made these last night and they were so good! Warning – it is one of my crazy creation, but 4 young kids inhaled them, so they can’t be that bad. I would have taken a picture, but they were devoured before I had a chance.
Crust:
Prepare baking sheets by sprinkling fresh ground popcorn or cornmeal on them. Preheat the oven to 500 degrees.
Mix up your favorite southern-style (not too sweet) cornbread recipe. You might want to double for a large family. Fold in a can of green chiles and a handful of cheddar cheese.
Cook on the griddle like a pancake. I used coconut oil, and they were so yummy. As you take them off the griddle, lay them flat on the cookie sheets.
(If you don’t have time to make the pizzas, you could stop here. They are really good and don’t need any toppings – not even butter.)
To make them whole grain, I used freshly ground popcorn and Chef Brad’s wonder flour. You couldn’t even tell the difference between these and white flour.
Make up a batch of refried beans, or use a canned version, and stir in about a cup of salsa and if you like it spicy, a tsp or so of ground jalapeño or chopped green chiles. Other variations could be chipotle, taco seasoning, chili seasoning, or you could add some taco meat. I stirred in 2 finely chopped green bell peppers, salsa, jalapeño powder and chili seasoning.
Spread the pancakes with the refried bean mixture and top lightly with cheddar jack cheese. Put in the oven for 5 minutes or until cheese is melted and slightly browned.
Top with taco seasonings like hot sauce or salsa, enchilada sauce, guacamole, sour cream or plain nonfat yogurt, fresh tomatoes, cilantro, etc…
Get creative and enjoy!
Pesto Chicken Pasta
Pesto Chicken Pasta
with zucchini and olives on the side
Serves 6
Ingredients:
Whole wheat thin spaghetti noodles
1 chicken breast, cut into 1″ cubes
1 can black olives, divided
2 cloves of garlic, minced
Olive oil
1/2 small onion
Italian seasoning
Parmesan cheese
Pesto – 1/2-1 cup
Salt and pepper to taste
4-5 small Italian squash, sliced thin
Cook noodles according to package directions. Chop olives. Meanwhile, heat large skillet and add 2Tbs olive oil. Add onions and chicken. Add generous amounts of Parmesan cheese and Italian seasoning. Add garlic and pinch of salt and pepper.
When chicken is almost done, add mushrooms. Sauté until chicken is cooked through and mushrooms are tender. Stir in 1/2 of the olives and pesto. Heat through.
Drain noodles. Combine in a large bowl with chicken mixture. Put skillet back on the stove. Heat and add Italian squash, the rest of the olives, and salt and pepper to taste. Sauté until squash is crisp tender.
Add salt, pepper, and Parmesan to the pasta to taste. Serve immediately.
Wish I had pictures to share, but it’s all gone now. 😉
Homemade Christmas – Fun Freebie
First of all, thank you to all who voted for my picture in the contest. I didn’t win, but there was some incredible artwork, and the winners’ images were amazing. I now have new goals to shoot for in improving my own art.
I was going to post about painting fabric, and I’ll get to that another day, but we had a bit of a surprise last week that has changed my plans. Unfortunately, redecorating our house has been put on hold, and Christmas prep has begun.
Yes, I know it’s not even close to Christmas, and we haven’t even had Halloween or Thanksgiving yet, and I know how annoying it is that stores have had Christmas decorations up since what seems to have been the 4th of July, but there is a very good reason for it.
Last week, we found out that my husband – who right now is the sole income provider – could possibly loose his job sometime in December or just after the new year. His company is being sold, and in order to keep his job, he has to interview and go through the whole hiring process with the new company, and there are no guarantees he will get the job. I hope and kind of think he will, but since there are no guarantees, we have decided to cut back all extra spending, and throw as much money into the emergency fund as we possibly can. As Dave Ramsey would put it, we are going to “scorched earth” and “beans and rice” – which means that our Christmas budget has been cut almost completely.
But that is not going to get me down. I am creative, and my kids are creative, (and still young) so I will be making Christmas this year. They will be getting probably close to as much as they have gotten in past years, it’s just going to be homemade, and since I have 4 kids, in order to get it all done, I have to start now.
I know what many parents are thinking, though. Homemade Christmas?!?!? Seriously?!?!? But I have some pretty awesome ideas, and since my kid’s video game and TV time is seriously limited anyways, and I realized that they never play with the store-bought toys I get them every year, I really think this could be one of the best Christmases ever. It’s fall break, and they have not been watching TV, or playing video games, or playing with the action figures and other toys they got in birthdays and Christmases past – they’ve been playing with the scrap wood leftover from me cutting out their presents, and a wooden sword their cousin made them – thanks Zach!
So the next couple of months, I will be busy sewing dress-up clothes for my daughter (thank you hobby lobby for your incredible sale on patterns and for Halloween costumes) with my huge pile of scrap material, making hobby horses/unicorns, rubber band guns and targets, robots and magic wands out of wood, personalized bedroom decorations, dress up jewelry and more. And the best part is, thanks to my time in selling art on Etsy, I have amassed quite a bit of art materials that I can use – so supplies will cost me almost nothing. So, as I finish some of my favorite projects, I’ll try to post them here – except for the ones I will be giving to potential readers – those I’ll have to post after Christmas so they’ll still be a surprise.
So one of the first things I have finished is something for my older boys – 7 and 9 years old. I have to admit, the idea isn’t mine. It’s something that was really popular when I was in elementary school, so I decided to re-create it. It’s a funny face book. It’s almost like a puzzle to help kids create guys like this:
 It’s a book that I made, scanned and printed. You can print it and have it spiral bound at Office Max for around $4 if you really want it to look nice, but since we are on a budget, I bought a 3-prong pocket folder, 3-hole punched the pages, and put them in there. The bonus is, they can put extra paper in the pockets.
Here’s how it works. There are separate pages with different options for each of the character’s features – there are pages with different faces, one with different eyes, one with different noses, and so on. Kids can pick a face and trace it onto a piece of regular copy/printer paper.
 Then pick a set of eyes, and trace that where you want it on the face:
 Then trace on a nose, mouth, head and body. To trace the ears, you need to trace one ear on one side of the head, then move the paper so that the other ear is positioned on the other side of the head.

And you have your finished product, ready to add color:
 Tips for kids:
1. Trace lightly in pencil. Some lines will overlap, and you’ll want to erase the ones that you don’t want to keep. For example, there is a helmet. If you draw the helmet on, you will need to erase some of the face lines, since the helmet will cover them up. It also helps if you make a mistake and need to erase, or change your mind of a set of features.
2. Once the picture is traced, it’s fun to go over it with a felt tip marker and then add color.
3. If you want to create your own body, just draw the basic outline for one of the bodies, and draw in your own clothes, shoes, accessories, etc…. You can also add your own things to the eyes, like eyelashes, ears – like earings, etc…
If you post this and give it to your kids, please comment. I can’t try it out on my kids until Christmas, and I want to see if it’s as popular as it was when I was in school.
To print, download the PDF. put together
Facebook contest – please vote.
I haven’t posted this week because I have been working hard on a Prismacolor art contest. There are some pretty awesome prizes, and I would love to win, so please vote for my piece here:
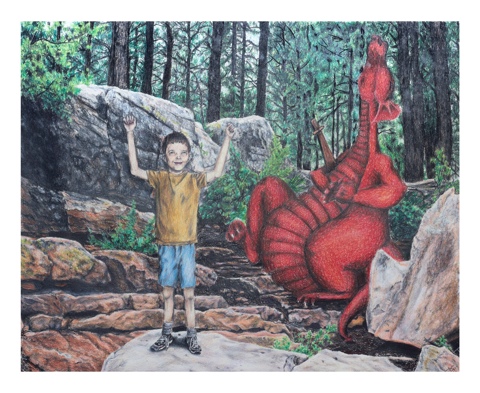
The background was taken from a beautiful lake we went fishing at this summer. The weather was so nice, and the area was gorgeous! However, I’m not usually very good at drawing landscapes, so this was a huge stretch for me. There were so many things in this picture that I struggled with, namely the amount of detail. I started by sketching the image in pencil, then worked my way from the bottom up, background first, and saved the boy and dragon for last. I broke a few art rules – like how you’re supposed to do the background before the forground, and a few others, but to keep myself from getting overwhelmed with the amount of detail in this drawing, I threw a lot of the workflow rules out and learned and experimented as I went. I learned a few things, like, the next time I want to create a peice like this, I’m going to paint it. I’m definetly more experienced at colored pencil, but quite a few times while I was drawing this, I wished Prismacolor made paint, so I could just paint it. ( one of the rules for the contest was that it had to be created with Prismacolor products ) Anyways, there are some absolutely beautiful images submitted by other artists in this contests, and I don’t know if I’ll win or not, but win or lose, I am happy with my drawing, that I completed it in time, and that I chose a drawing that really stretched my skills. I didn’t even think I’d be able to pull off at all, let alone in time.
Anyways, I will be back to posting tutorials this week. I made a block print and painted fabric baskets for a bookshelf, and I’m excited to share. It’s a really fun and easy way to dress up or personalize fabric.
Coffee Table
The first room we are decorating is the downstairs front room and entry way. In the front room, I already have curtains made, so picking a theme and colors for the room were easy. I want a country (not too country), colorful (not too bright colorful look.One of the first things we made to decorate was a coffee table. I have bought cheaper ones from IKEA, and they’re smaller than I wanted and, at least the one we bought a while ago, was pretty cheaply made. Plus, to find the kind of table I wanted would kill our budget for the house. I wanted a white, chunky, sturdy (I do have kids) table. A little rustic looking. So, I decided to build my own.
I drew up the plans, which to keep it simple, consisted only of 2×4’s, 2×6’s, 4×4’s as the legs, and a 2×3 as the support for the bottom of the table. I measured how big I wanted the table, and when I went to Lowes, I had them cut the boards to the size I needed. (Note: They can’t cut the 4×4’s, so we had to have that cut somewhere else) Oh, and important information – at least the 2×6’s that we bought were not actually 2 inches by 6 inches. They were more like 2″ x 5.5″, so you might want to check on that when coming up with your measurements. We laid the whole table top out before attaching anything together and found that we had to trim some of the other boards.
I sanded all of the boards, and then used the 2″x6″ boards to form the table-top by laying them side-by-side, using as many as I needed to make the table as wide as I wanted. I laid them down so that when the table top is put together, the top of the table will be upside down and you can work on the underside of the table top, so make sure the nicest-looking side of the board is face-down. I made sure the boards lined up straight by pushing them all against a flat wall. I laid the 1×3 across the middle of the boards, perpendicular to the boards and screwed holes a little smaller than the srews I was using where I wanted to put the nails. Then I screwed the 2×3 to the 4×6’s. This will support the middle of the table, and hold the 4×6’s while I finish the table top.
I bordered the 2×6’s with the 2×4’s on their sides. I drilled holes where I wanted to put screws to attach the 2×4’s to the 2×6’s. Then I put the 4×4’s against the 2×4’s in the corners to form the legs of the table. I put two screws in each side of the 4×4 that was touching the 2×4 to hold it strongly in place. I turned the table over, checked to make sure it was sturdy – and trust me, it was. I sanded it one more time to get the table top as even as I could, filled the screw-holes with wood putty, and then primed and painted it.
I hope I explained that clearly. If you have any questions, leave them in the comments.
-

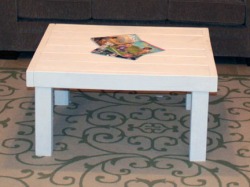
- This is the finished, painted table. We could jump on it and it would hold.
-

- We laid the table out before attaching anything to make sure we had the measurements. Good thing, too, as we had to trim some of the 2×4’s!

-
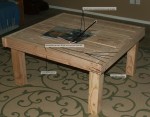
- how we put it together
I’m Baaaaack – maybe
Kids are back in school, business is over, and I’ve been enjoying a breather. Now that my head has come up out of homeschool-land, I took a good look around the house and realized it had been neglected. It needed to be decorated.
So in the middle of near hyperventilating at the horrible state of my house, I decided to act.
This time I did things differently. Instead of taking the various mis-matched pictures, frames, and furniture I had and putting them on the walls and calling the place decorated, I decided to start with a plan.
I took pictures of the major rooms in my house and had them printed. I realized it is a lot easier for me to really see the whole room and what was working and what wasn’t in print. Not really sure why.
Anyways, I looked at the photos and drew in (or took out) what I wanted to do to the place. That served as our roadmap. I then chose a deadline and laid out in Excel the steps we would need to take to make this house beautiful by the deadline, and we have been making a lot of progress.
There is a catch, however. I have less than $1000 to completely redecorate this whole house. It sounds like a lot, until we realized we needed some furniture items. This meant that we would have to get creative, and I learned that I’m much more creative when I have a purpose.
So, I want to post some of my ideas to share, and maybe even some before and after pictures. My house probably still won’t look like a model home, but it will look like my home, with my style, and that makes me happy.
Teddy Bears, Blankies, and….Wet Pajamas?
This cracked me up today, and it was either the funniest thing I’ve seen in a while, or I am in desperate need of some humor.
My youngest is the my only child who loves blankets and Teddy Bears. Recently, however, he has also come to love his pajamas. I was switching the wet clothes from the washing machine to the drier, and he was helping me by scooting the wet clothes I threw down onto the door into the dryer.
I threw his wet red and grey striped pajama pants onto the dryer door, thinking nothing of it, when out of the corner of my eye, I saw him starting to sneak off with them.
I grabbed the other end of the pajamas, and the next thing I know, we are in an all out tug of war over wet pajamas he thinks he can wear. I mean, this kid is on his back, bracing his feet against my hands, trying to get away with them, yelling as if we were fighting over a beloved friend, or his stuffed tiger, or favorite blanket.
And this is all after an earlier fight over getting his shoes into the wash.
My Shop is on Vacation. But I’m Not.
I haven’t blogged since my Halloween giveaway. So I put my shop on vacation, while we have been busy with a lot of things that have come up that has required our time, and we have been making some important decisions. Unfortunately, one of those decisions has been whether or not to reopen my shop.
I have learned so much about running a shop since I opened it, and one of the things we have learned is just how much time it takes to run a shop. We have been considering it and prioritizing, and thus far, my shop will reopen. I’m not sure when, as I have learned so much since opening my shop, that I am using what I have learned to make some changes and some new goals regarding my shop. It is my goal that when I do reopen my shop, I will have an inventory ready to ship as soon as I get an order. I also hope to have a more simple, easier to navigate shop, with more organized products. I am also excited about some of the new items I will have in my shop.
Until then, I will continue blogging and posting coloring pages and other fun things, as well as updates on my shop and it’s reopening date. After all, blogging has been my favorite part of opening my shop.
Halloween Bag Giveaway: And Winner Is…..
…..Lacie!!! Congratulations. I will send an email for personalization and shipping info. Thanks to all who entered and my kids love the jokes.
“Come Follow Me”
My brother, Jimmy, just moved into a new house and asked if I would draw a picture of the Savior, Jesus Christ for his place. I was thrilled. I had never done any serious pictures of the Savior, and the ideas started flooding. (Jimmy, you may get more than 1)
I finished my first one, and listed it on Etsy. It’s titled, “Come Follow Me,” and was inspired by Matthew 11:28, “Come follow Me, all ye that labour and are heavy laden, and I will give you rest.”

After listing this on Etsy, I realized I hadn’t posted on my blog for a while, and that I needed to post about this print. I needed to post my testimony, because this blog is about who I am, this is one of the most important parts of who I am.
I know my Savior, Jesus Christ lives. I know he lived on this Earth and showed us the way to return to Him. He suffered and died for us. I know he loves me, and that there is no burden I could possibly bear that he can’t lift, and no pain that he doesn’t understand. I know that when I rely on Him, my burdens are lighter, and that He takes care of me. Not always in the way I want or expect, but always in a way that helps me grow and become more like Him – and that is my goal, to follow Him and become more like Him. I love my Savior and have felt His love, and it has sustained me through some of the worst times in my life.
